
Oxide Flooring Technique: Step-by-Step Process, Colors, and Design Ideas for Timeless Floors
1. Introduction – The Timeless Beauty of Oxide Floors
Walk into an old South Indian home and you’ll often notice something instantly comforting underfoot — smooth, cool red floors with a deep natural shine. That’s the charm of oxide flooring. Once common across India, this flooring technique is now making a strong comeback for its timeless beauty, eco-friendly appeal, and cost-effectiveness.
Oxide floors blend tradition and craftsmanship. They aren’t made from tiles or marble but from a simple mixture of cement, natural oxide pigment, and water. The result? A seamless surface that stays cool in hot weather, ages gracefully, and reflects light softly — adding warmth and depth to interiors.
What’s fascinating is how the oxide flooring technique has evolved from old construction methods into a modern design statement. Whether you’re restoring a heritage home or designing a contemporary apartment, oxide flooring offers a connection to the past and a path to sustainability.
In this guide, we’ll explore what makes oxide flooring special — from the technique behind it to color variations, care tips, and modern design ideas.

2. Understanding the Oxide Flooring Technique
Before diving into the process, let’s understand what oxide flooring really is. Unlike tiled or stone floors, oxide flooring is poured, polished, and hand-finished directly on the surface. It’s made from a blend of white cement, oxide pigment (which gives it color), and water.
Once mixed, this paste is applied over a cement base, cured carefully, and polished repeatedly until it achieves a soft matte or glossy mirror-like finish. The surface is seamless — no joints or tile gaps — which makes it hygienic, easy to clean, and visually fluid.
This flooring method has deep roots in traditional Indian construction. It was especially popular in Kerala, Tamil Nadu, and Goa — places known for humid climates. The reason is simple: oxide floors stay cool underfoot and resist heat better than tiles or vinyl.
Today, architects and designers are reviving oxide flooring for sustainable homes, boutique stores, and even modern cafés. Its minimalism, natural texture, and hand-crafted finish suit both old-world charm and contemporary aesthetics.

3. Step-by-Step Guide: How to Achieve Perfect Oxide Flooring
Creating a flawless oxide floor takes patience and precision. It’s an art that blends science with craftsmanship. If done right, it can last for decades without losing its shine. Let’s walk through each step of the process.
Step 1: Preparing the Surface
The foundation determines the quality of the finish. The base layer should be rough, level, and free of dust or oil. Builders usually use a cement screed base with proper slope and drainage. Any cracks or uneven areas must be corrected before starting the oxide work.

Step 2: Mixing the Oxide Paste
The magic begins with the mix. The oxide powder (available in colors like red, green, black, yellow, and more) is blended with white cement and a small amount of water. The goal is to create a smooth, lump-free paste. The ratio of pigment to cement varies depending on the desired depth of color — a stronger tone needs more oxide.

Step 3: Applying the First Coat
The first coat of oxide paste is spread evenly across the surface using a steel trowel. This coat is usually 2–3 millimeters thick. The craftsman works carefully to ensure there are no air gaps or streaks.

Step 4: Leveling and Smoothening
Once applied, the surface is leveled and smoothened with trowels and paper. This stage decides how even the final color will be. It’s a slow, detailed process — done with steady hands and sharp eyes.

Step 5: Curing the Floor
The surface is kept moist for three to four days by sprinkling water gently. This step strengthens the bond and prevents cracks. Skipping curing is one of the biggest mistakes that can dull the floor or cause hairline fissures later.

Step 6: Polishing and Waxing
After curing, wax polish mixed with a small amount of oxide pigment is applied to the surface. This enriches the color and prepares it for the final buffing.

Step 7: Buffing the Floor
Using a buffing machine with coconut fiber pads, the surface is polished until it achieves a natural gloss. The more you buff, the deeper and richer the shine becomes. Patience pays off — oxide floors get better with each polish.
The result is a seamless, smooth, and lustrous floor that feels both grounded and luxurious.
AI Image Prompt:
A craftsman buffing a red oxide floor with coconut fiber pads under warm indoor lighting.
4. Colors in Oxide Flooring and Their Effects
One of the most beautiful aspects of oxide flooring is the variety of colors it offers. Each hue tells a story, and the pigment you choose defines the atmosphere of your space. Here are some of the most popular oxide colors and what they evoke:

- Red Oxide: The classic shade of Indian homes — warm, earthy, and timeless. Red oxide floors bring character to verandahs, courtyards, and living rooms.

- Yellow Oxide: Cheerful and bright, perfect for kitchens and creative studios. It adds a sunny glow to interiors.

- Black Oxide: Bold, contemporary, and dramatic. Works beautifully in modern minimalist settings with wooden or metal accents.
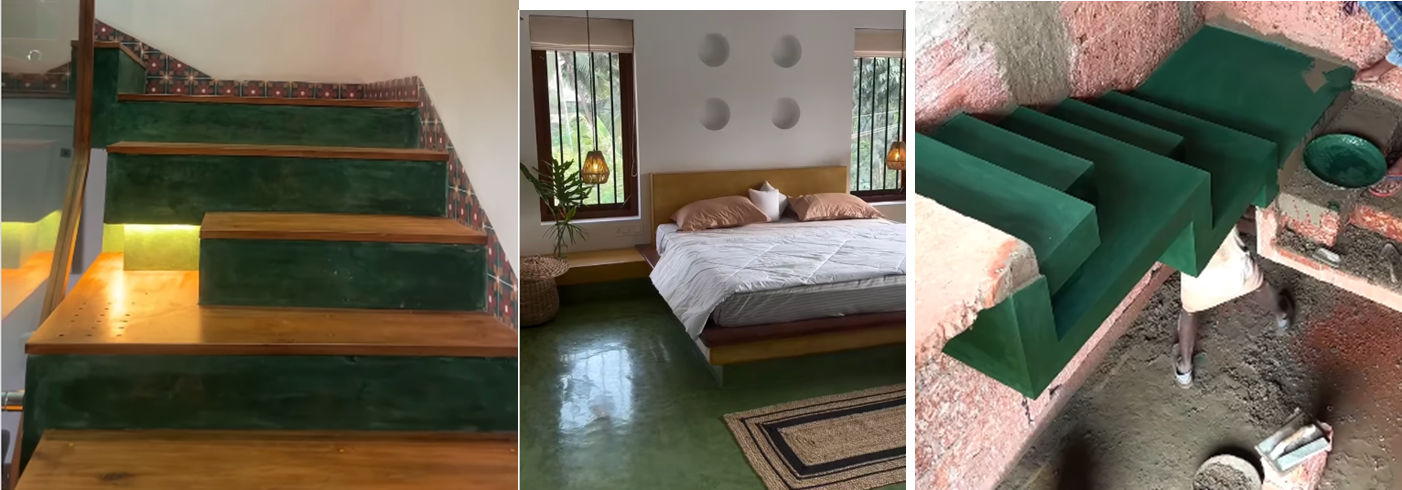
- Green Oxide: Refreshing and soothing, reminiscent of nature. Ideal for verandahs, patios, or spaces that open to gardens.

- Blue Oxide: Calming and unique, often used for meditation rooms or cool coastal designs.


- Brown and Terracotta Oxide: Earthy and natural, great for rustic or heritage-inspired homes.

- Grey Oxide: A modern favorite — industrial, elegant, and neutral. Perfect for blending old-world craft with new-age design.
Architects often mix pigments to create custom tones — blending red with brown for a vintage look or green with grey for a muted modern palette. Always test small patches first, as final colors may vary based on curing and polishing.

5. Benefits of Oxide Flooring
Oxide floors are beautiful, but they’re also incredibly practical. Here’s why homeowners and architects love them:
They’re durable. Once polished, oxide floors last for decades without cracks or discoloration. Many 50-year-old homes still have their original floors intact.
They’re eco-friendly. Oxide floors use natural pigments, minimal cement, and no synthetic adhesives or coatings.
They’re cool underfoot, making them perfect for tropical and warm regions.
They’re seamless and hygienic, since there are no grout lines or joints for dust and dirt to collect.
Finally, they’re affordable and low-maintenance. Regular sweeping, occasional polishing, and gentle care keep them shining for years.
The beauty of oxide floors is that they grow better with age — developing a natural patina that adds soul and authenticity to any space.

6. Design Inspirations – From Heritage to Modern Spaces
Oxide floors carry nostalgia, but that doesn’t mean they’re old-fashioned. Designers today are finding new ways to use this traditional technique in fresh, modern contexts.
Imagine a minimalist home with grey oxide floors, concrete walls, and warm wooden furniture — elegant, timeless, and distinctly Indian. Or a boutique café with red oxide floors that echo old-school charm while highlighting modern art and lighting.
In contemporary homes, oxide floors often blend with lime plaster walls, brick textures, or terrazzo inlays. You can even combine two oxide colors to create subtle borders or patterns for open spaces.
Because oxide floors are handcrafted, no two surfaces look exactly alike. That uniqueness is what makes each space personal — a perfect balance of heritage and modern design.

7. Common Mistakes to Avoid During Application
Oxide flooring is a delicate art. A small mistake in the process can affect the final finish. Here are common pitfalls and how to avoid them:
Applying oxide paste over a wet or uneven base can lead to peeling or patchy color. Always ensure the base is firm and slightly rough.
Using too much water during mixing weakens the surface and causes cracks. The paste should be thick and creamy, not watery.
Skipping curing or polishing too early prevents proper bonding and shine. Patience during curing (3–4 days) is crucial.
Lastly, avoid over-buffing the surface before it’s fully set. Polishing prematurely can leave swirl marks that are hard to fix.
If you’re trying oxide flooring for the first time, consider hiring a craftsman experienced in traditional techniques. Their skill and precision make all the difference.

8. Maintenance and Longevity
One of the best things about oxide floors is how easy they are to maintain. Unlike tiles that can chip or wood that needs varnish, oxide floors require simple care.
Sweep regularly to remove dust, and mop occasionally with mild soapy water. Avoid harsh detergents or acidic cleaners, which can dull the surface.
If the shine fades over time, reapply a layer of wax polish and buff gently. This restores the luster and deepens the color naturally.
With proper care, an oxide floor can easily last more than 30 years. And as it ages, it develops a richer, softer look — proof that some materials truly get better with time.

9. FAQs – Common Questions About Oxide Flooring
Q1. What is oxide flooring made of?
It’s a mixture of white cement, oxide pigment, and water — polished into a seamless, glossy surface.
Q2. Is oxide flooring eco-friendly?
Yes, it uses natural pigments and minimal materials, making it sustainable and non-toxic.
Q3. How long does oxide flooring last?
Properly cured and maintained oxide floors can last over 30 years, often becoming more beautiful with age.
Q4. Can oxide flooring be done on old surfaces?
Yes, but the old surface must be cleaned and roughened to ensure proper bonding.
Q5. How can I maintain the shine?
Reapply wax polish every few years and buff lightly to maintain the natural sheen.
10. Conclusion – Old-World Craft, Modern Appeal
Oxide flooring is more than just a construction technique — it’s an artistic legacy. It tells stories of hands that mixed, spread, and polished each layer until it gleamed. In a world filled with factory-made finishes, it stands out as a symbol of craftsmanship and patience.
This traditional oxide flooring technique is now being rediscovered by a new generation of homeowners and architects. It bridges the past and present beautifully — sustainable, affordable, and rich with character.

If you’re designing a new home or renovating an old one, consider this humble yet elegant flooring option. It’s proof that true beauty doesn’t always come from expensive materials — sometimes, it’s crafted slowly, layer by layer, with care.


.jpg)
.jpg)
.jpg)
.jpg)
.jpg)


.jpg&description=Oxide Flooring Technique: Step-by-Step Process, Colors, and Design Ideas for Timeless Floors)
0 Comments