

Learn Blender from scratch with this beginner-friendly guide. Discover how to model, texture, light, and render your first 3D project in Blender.
Introduction
Blender is one of the most powerful free 3D modeling and rendering tools used by designers, architects, and artists worldwide. If you’re a beginner looking to learn Blender, this step-by-step tutorial will guide you through the essentials—helping you create your first 3D model and render in just 30 minutes.
Understanding Blender’s Interface:
Blender’s user interface may seem overwhelming at first, but it’s intuitive once you know the basics:
Viewport: Main 3D workspace.
Toolbar: Modeling, sculpting, and editing tools.
Timeline: For animation.
Properties Panel: Materials, modifiers, and render settings.
Shortcuts: Move (G), Scale (S), Rotate (R).
Basic 3D Modeling:
Start with a default cube and practice transforming it:
Extrude: Extend geometry to form shapes.
Loop Cuts: Add edge loops for more detail.
Proportional Editing: Smooth transformations.
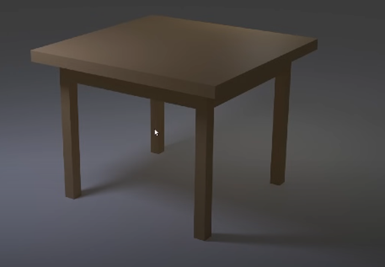
By the end of this step, you can model a simple table or chair.

The Object is created using cube in Blender.
- Base plane should be created because it is transparent with no ground plane in this case depth of shadow will not be seen clearly
- Add-Mesh- Plane
- Scale to the extent as shown so can not see the transparent background.


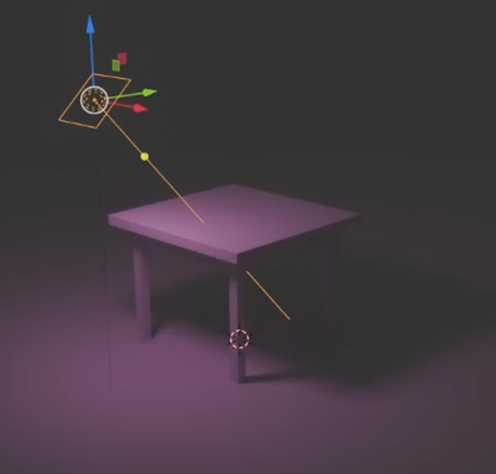
Camera Setup and Rendering
Add a Camera, position it for the best angle.
Choose Cycles (realistic) as the render engine.
Adjust output resolution and settings.
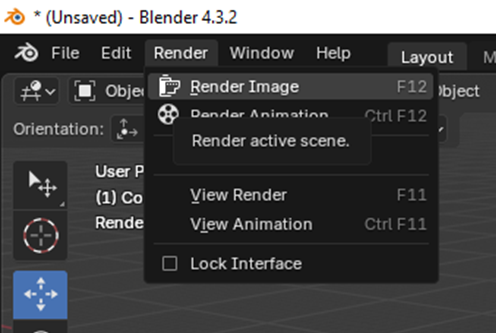
Render your final image to see the result.

Once you press this you will be able to see this on screen. This is nothing but we are viewing through the camera.

Should not move the camera using mouse presently if it is done you will come out of the camera.


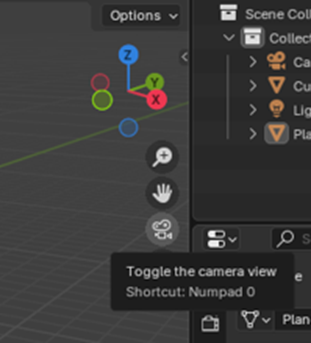
Now Select the –Camera- from scene collection


Now Click the - Toggle the camera view - to see the camera location and the object
Lighting the Scene
Lighting plays a key role in rendering:
Add an Area Light and position it for highlights.
Use HDRI environments for natural lighting.
Adjust intensity and shadows for depth.


Select View port shading
Under Render properties – Render Engine- Cycle

Move the Light location as per your desired location
Select the light from Scene collection

Light icon- Object Data properties- shows all the properties of light
- Type of lights – Point, Sun, Spot & Area
- Power
- Shape
- Size and
- Color
Of the light can also be edited in the settings.

Select the Table / Cube from Scene collection

Applying Materials and Textures
To make your model realistic:
Material – Material properties- shows all the properties of Material
Add a new material in the Properties panel.
Adjust Base Color, Metallic, Roughness for different effects.
Use UV unwrapping to apply textures properly.
Add a new material

Base Color– Select the color

Render the image
- Click camera from scene collection
- Toggle camera view.
- Under Render- Render image (short cut key - F12)
FAQ's
1. Is Blender free to use?
Yes, Blender is completely free and open-source, making it ideal for beginners and professionals alike.
2. How long does it take to learn Blender?
Basic modeling and rendering can be learned in a few days. Mastery takes consistent practice over weeks or months.
3. Can Blender be used for architectural visualization?
Absolutely! Blender is widely used for architectural modeling, interior design, and photorealistic renders.
4. What computer specs do I need for Blender?
A system with at least 8GB RAM, a modern GPU, and SSD storage is recommended for smooth performance.
5. Can Blender create animations?
Yes, Blender includes a full animation suite, allowing you to animate models, cameras, and lights.

%20(6).jpg)
.jpg)
.jpg)
.jpg)


.jpg)

0 Comments